Using Charles Proxy to Debug Android SSL Traffic
I’ve been a longtime user of Charles for checking requests and responses from the web applications I write. It’s a great cross-platform tool to help debug any kind of HTTP request when developing applications locally.
Charles as described on its site:
Charles is an HTTP proxy / HTTP monitor / Reverse Proxy that enables a developer to view all of the HTTP and SSL / HTTPS traffic between their machine and the Internet. This includes requests, responses and the HTTP headers (which contain the cookies and caching information).
Lately, however, I’ve been doing a lot more work on Android apps than I have on server-side applications. I figured it would be similarly helpful to debug some of the requests we were making from our apps without logging out to Logcat and cluttering our app code.
The requests I wanted to check happened to be protected by SSL, so in addition to adding the proxy information to my device’s networking configuration, I also needed to install Charles’ root certificate. It turns out that this is possible, but requires a bit of work. Luckily I have now done this enough times to feel good about writing it up.
First off, this setup will not work on an emulator without an additional step (see below). I admittedly haven’t needed to do any proxy debugging without a test device, though.
Also, as of this post, we are targeting Android SDK version 25 in our applications, but this specific setup should work with all versions. If not, feel free to correct me so that I can update this post.
Now on with the show.
Setting Up Your Project
If your test device is running Android 7.0 or newer, there are a few extra steps to ensure that you are able to trust the Charles CA Certificate. To ensure Android trusts the certificate, you’ll need to specify a Network Security Configuration for your application. There are a few different ways of adding your certificate to the application’s trusted configuration, but I found that the easiest was not to include Charles’ certificate within my application code, but to simply trust the user-installed CA certificates (like previous versions of Android used to do).
Specifying theandroid:networkSecurityConfig property within your AndroidManifest.xml file:
1<application
2  android:allowBackup="true"
3  android:icon="@mipmap/ic_launcher"
4  android:label="@string/app_name"
5  android:roundIcon="@mipmap/ic_launcher_round"
6  android:supportsRtl="true"
7  android:theme="@style/AppTheme"
8  android:networkSecurityConfig="@xml/network_security_config">
Specifying the res/xml/network_security_config.xml file:
1<?xml version="1.0" encoding="utf-8"?>
2<network-security-config>
3  <debug-overrides>
4    <trust-anchors>
5      <!-- Trust user added CAs while debuggable only -->
6      <certificates src="user" />
7    </trust-anchors>
8  </debug-overrides>
9</network-security-config>
Setting Up Charles
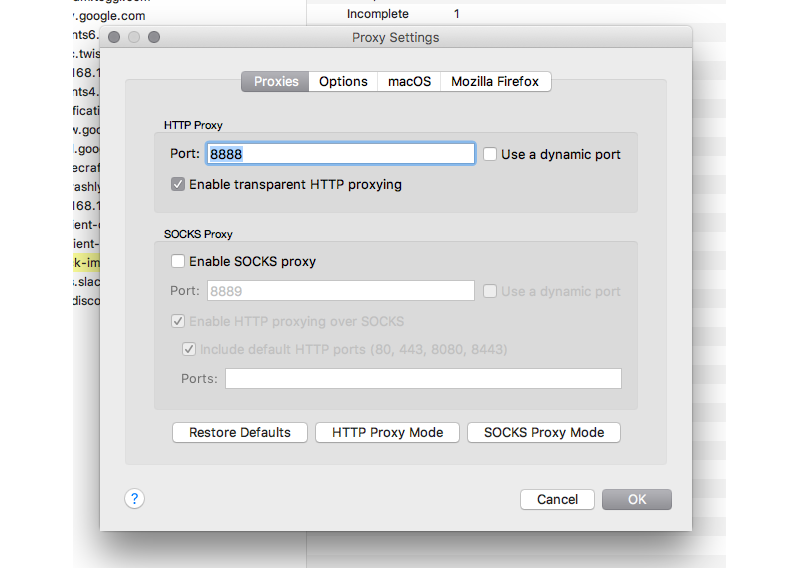
Open up Charles on your computer and then open Proxy > Proxy Settings from the toolbar. You’ll need to make note of the HTTP Proxy Port that is specified.
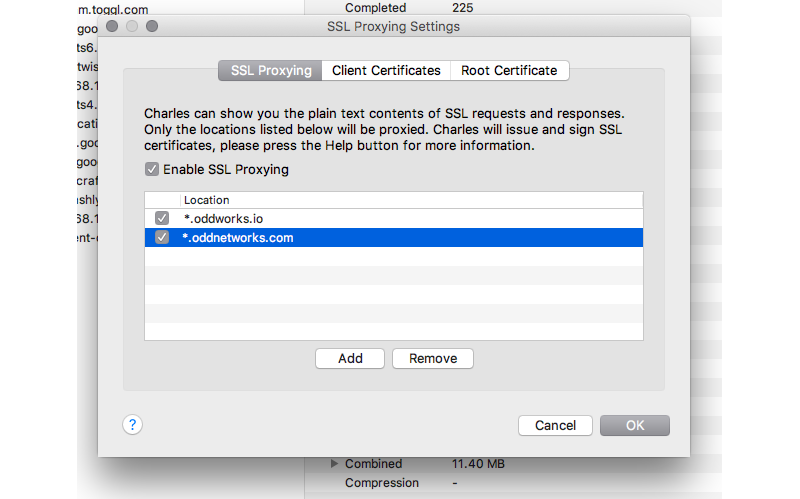
Then open up Proxy > SSL Proxying Settings from the toolbar and add the appropriate Locations (host/port) for the requests you wish to debug. I usually just add a wildcard route like *.myapidomain.com but specific domains like whatever-app.herokuapp.com work fine as well.
Setting Up Your Android device
First, make note of your computer’s IP address within your local network. You’ll need it in the next step.
Also make sure Charles is open and that the computer is on the same wifi network as the Android device you’ll be setting up.
Go to your device’s settings and wifi configuration.
Press and hold on the network you’re going to use and select Modify network from the alert modal.
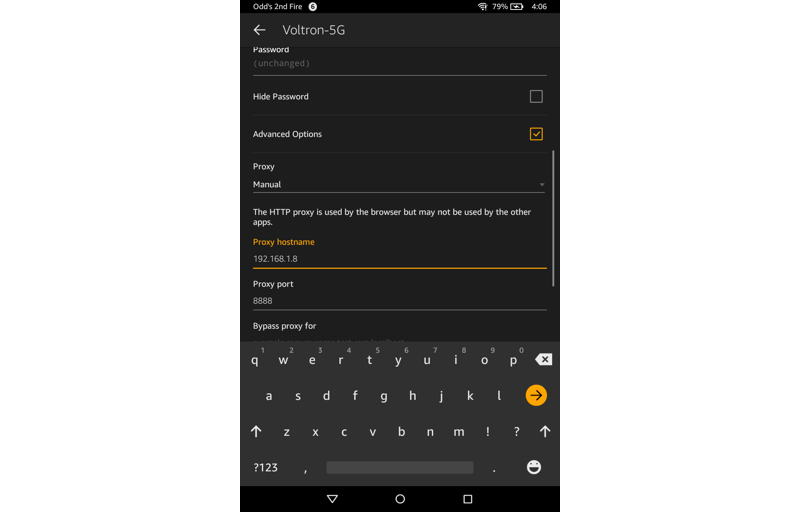
Then check Advanced Options and scroll until you see Proxy.
Tap the Proxy dropdown and select Manual.
For the Proxy hostname input your computer’s IP address that you noted above.
Then for the Proxy port use the HTTP Proxy Port that you noted from Charles’ Proxy Settings from above.
Tap Save.
After saving, you may notice a pop-up on your computer like this:

You should now click Allow to let your Android device connect to Charles via the proxy it has set up.
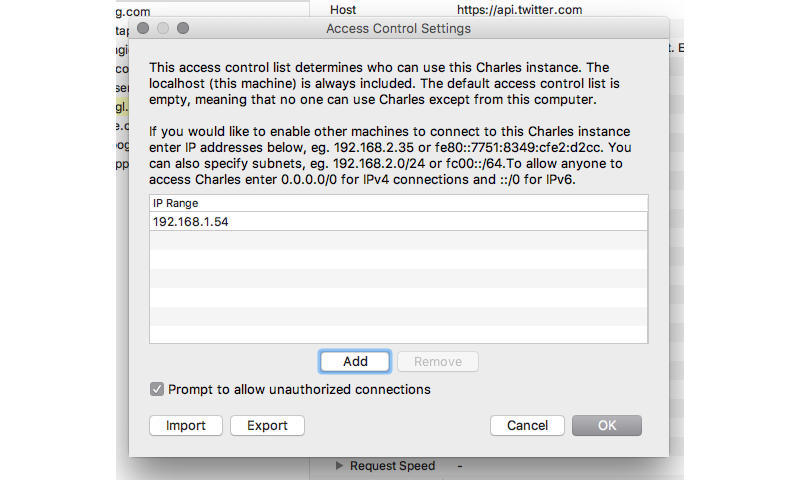
If you don’t see this prompt, you can ensure that your device can use the proxy from within Charles by going to Proxy > Access Control Settings and adding your Android device’s IP address on the wifi network.
One more step!
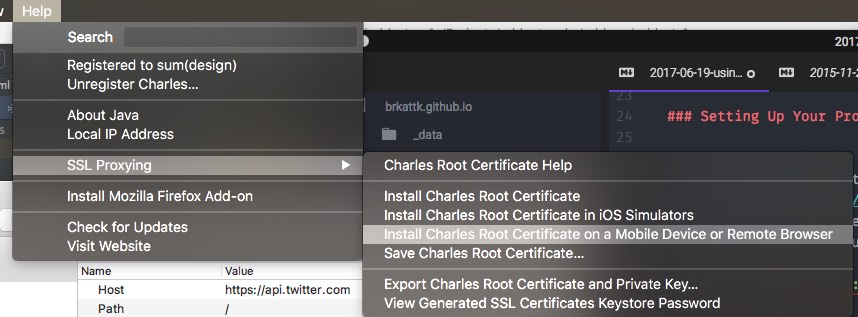
Now on your Android device, open up the browser and go to the following URL chls.pro/ssl. You can also see these instructions from within the Charles app - go to Help > SSL Proxying > Install Charles Root Certificate on a Mobile Device or Remote Browser.
The browser should download the cert and once finished, tap to open the file. Then Android should prompt you to install the file.
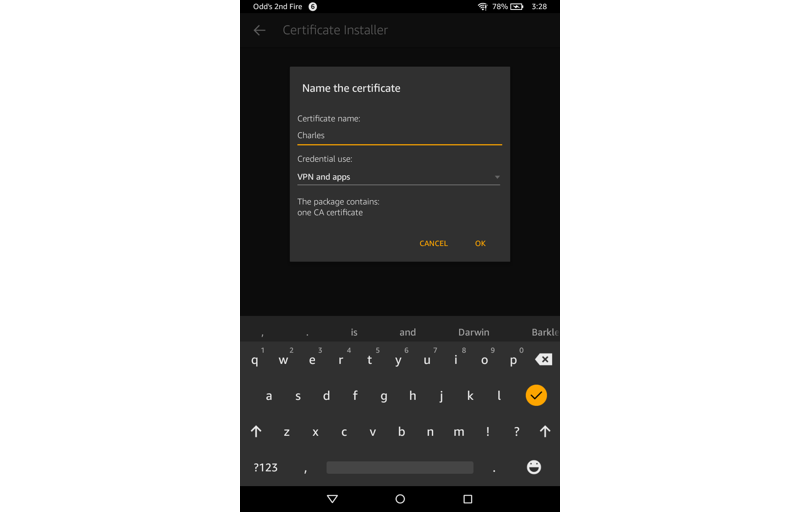
After you’ve named the certificate and tapped “OK”, you will either be prompted to input your device’s pin/password or prompted to set up your device’s pin/password. Once that process is complete, you should be ready to debug some requests.
Note Until you remove the manual proxy from this device’s wifi configuration, whenever you use this network again you will need to have Charles open and running on the same IP address. You can always set the network configuration back to “Proxy: None” once you’re done debugging.
Using An Emulator
According to Charles’ site you can start the emulator with a flag in order to use the proxy.
In the Android emulator run configuration add an Additional Emulator Command Line Option: -http-proxy http://LOCAL_IP:8888
Where LOCAL_IP is the IP address of your computer, not 127.0.0.1 as that is the IP address of the emulated phone.
EDIT: Thanks to Brandon Davis for pointing out that the full command would be
emulator -avd EMULATOR_NAME -http-proxy IP_ADDRESS:PORT
In addition, Android Studio 3.0 will now allow managing proxy settings for your emulator images. Read all about the new features here and if you can’t wait for a stable release, 3.0 is currently available in the dev channel.
Debugging requests
Now that you’re set up, you should see Charles recording traffic from your device. As long as you’re configured properly, you should see those SSL request details from the domains you specified in Charles’ SSL Proxying Settings.
Feel free to discuss your results and let me know if I missed anything obvious.